Artflow Documentation
Artbeat Studios' Print on Demand App documentation - last updated on 03/05/2024
Introduction - Terminology
This document contains specialized terms which may not be immediately clear. Below, we provide a list of these terms and their definitions for your reference:
| Term | Definition |
|---|---|
| Map or Mapping | Mapping serves as a dictionary that enables us to correlate products from your platform with our product offerings. |
| Variant | A variant refers to a specific version of a product, defined by attributes such as SKU, price, and options including media, sizes, and mounting types, which collectively describe the purchasable item. |
| Option Name & Option Value | Options represent selectable attributes within a variant, allowing customers to choose preferences often displayed on your website's product page. |
| Bundle | We also provide product grouping, enabling you to offer bundles for each variant, ideal for products like triptychs or sets of six distinct images, among others. |
Uploading High Resolution Images to Artflow
Many eCommerce platforms impose limits on the resolution and file size of product photos and often display these images publicly, leaving them unprotected. Consequently, you might hesitate to use high-resolution images for online display. To address this, our app offers a private album feature where you can upload your high-resolution images, which allows us to produce prints of the highest quality.
Please follow the steps below to upload an image or view our Video 4(a) for a walkthrough:
Navigate to the Albums page
Select or add a new album
Drag and drop your image(s) onto the box that says “Drag ’n’ drop files here, or click to upload files”
Leave the page open until the uploading process completes.
Please view our print specifications for guidelines and image requirements for the best prints.
Video 4(a) - A video walkthrough of how to upload images to Artflow
Connecting Your Products to Artflow
Artflow will retrieve your platform's products and variants upon a successful installation with your eCommerce platform. This means you do not need to recreate your product catalog from scratch when using our app. Below is a list of one-way near-time synchronization to our app by platform:
| Platform | Webhooks | Notes |
|---|---|---|
| Shopify | Orders & Products | All new or updated Orders and Products are pushed to our app within seconds for a one-way sync. |
Once you can see your eCommerce products listed in our app, you have two methods to map them to Artbeat Studios for fulfillment:
Rule Based Option Mapping (RBOM)
Specify a set of rules to automatically map your products based on your variants' option names and values once you've mapped an image.
To get started:
Click on 'Add Mapping' button.
Enter Option Name, such as 'Medium' as shown below.
Enter Option Value.
Click on a Medium checkbox, such as 'Fine Art Paper'
(Optional) Select any mount or options that you want to include.
A video walkthrough of this process is below in Video 1(a):
Video 1(a) - A video walkthrough of how to configure a basic mapping in the RBOM
RBOM Examples and Scenario
Example 1: Single mapping
The most common is a product variant with one option name & value mapped to a single Artbeat product.| Option Name | Option Value | Maps To: |
|---|---|---|
| Medium | HD Metal | HD Metal - White Matte |
Example 2: Grouped mapping
It is also possible to map one option name/value to multiple Artbeat products.| Option Name | Option Value | Maps To: |
|---|---|---|
| Medium | Canvas | Canvas: Gicleé Canvas Wrap Thickness: 1.5" Gallery Wrap Wrap Style: Mirror Edge |
Unique Scenario 1: Overlapping options
When there are 2+ RBOM with overlapping options, then the single mapping will override the grouped mapping.| Option Name | Option Value | Maps To: |
|---|---|---|
| Medium | HD Metal | HD Metal - White Matte Mount - Float Mount |
| Mount | Wood Inset | Mount - Natural Wood |
Assuming you have the following options on your frontend:
Option 1: Medium
HD Metal
Option 2: Mount
Float Mount
Wood Inset
If your customer selects HD Metal & Wood Inset, then 'Mount - Natural Wood' will override your 'Mount - Float Mount' for a final mapping on Artbeat to be:
HD Metal - White Matte
Mount - Natural Wood
Unique Scenario 2: Mixed product options
When you re-use options in your variant, then our rule will only map to what is available for our product.| Option Name | Option Value | Maps To: |
|---|---|---|
| Medium | HD Metal | HD Metal - White Matte |
| Medium | HD Acrylic | HD Acrylic - Acrylic 360 |
| Mount | Float Mount | Mount - Float Mount |
| Mount | Wood Inset | Mount - Natural Wood |
Assuming you have the following options on your frontend:
Option 1: Medium
HD Metal
Acrylic
Option 2: Mount
Float Mount
Wood Inset
If your customer selects HD Metal & Float Mount, then your final mapping on Artbeat will be:
HD Metal - White Matte
Mount - Float Mount
If your customer selects Acrylic & Float Mount, then the mapping will NOT match on Artbeat since we do not offer Float Mount for Acrylic.
Variant Mapping (VM)
This feature provides the ability to manage mappings on a variant-by-variant basis, offering enhanced granularity and control over each variant.
To enable and configure variant mapping for a variant, follow these steps; video walkthrough available in Video 1(b):
On the "Products" page, click the "Edit" button next to your product.
Find the variant you wish to configure and click the "blue pencil icon" to edit.
Toggle "Rule-Based Mapping" from ON to OFF.
You may now configure all aspects of this variant manually
Please note that when you disable RBOM for a variant and configure it manually, Artflow will continue to use the root image for the product if an alternate one is not chosen during the Variant Mapping.
Video 1(b) - A video walkthrough example of how to configure Variant Mapping
Variant Mapping Examples
Example 1: Map a different product
This example shows you how to use variant mapping to change a medium to override RBOM.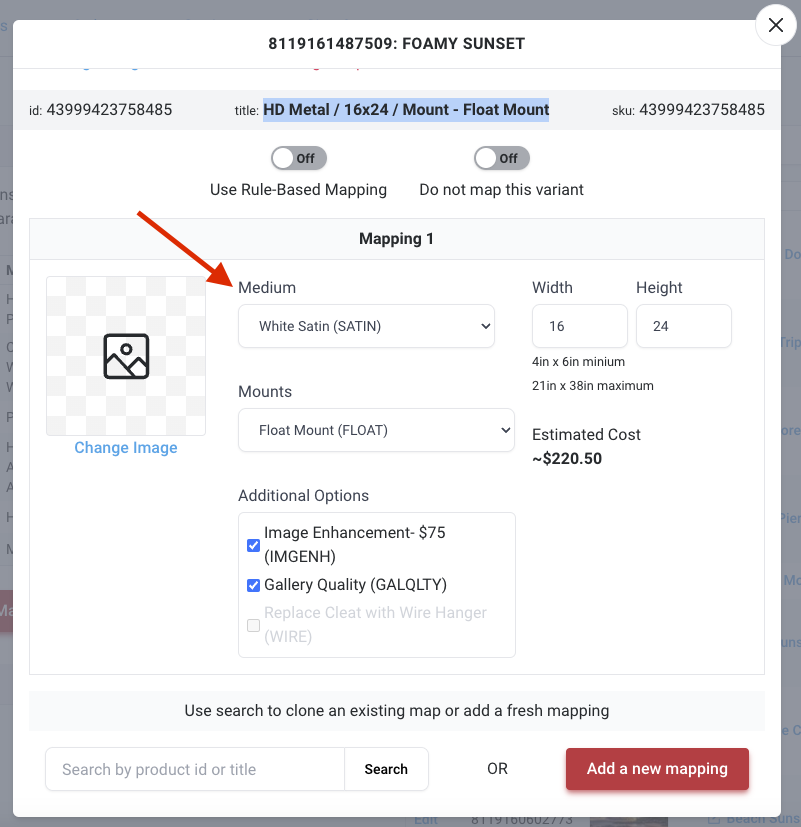
Image 1-1: A screenshot indicating where the medium used for the variant can be altered during Variant Mapping
The field identified with the red arrow in Image 1-1 is where you can change the medium.
In Image 1-2:
Shows the variant we've edited, the SKU showing SATIN to reflect our medium change from White Gloss. Please note the absence of a small robot icon at the beginning of this field signifies that the RBOM is not active on this variant.
Shows another variant of the same product that uses RBOM to automatically map to "WHITE GLOSS" and contains a small robot icon to indicate this variant was automated.
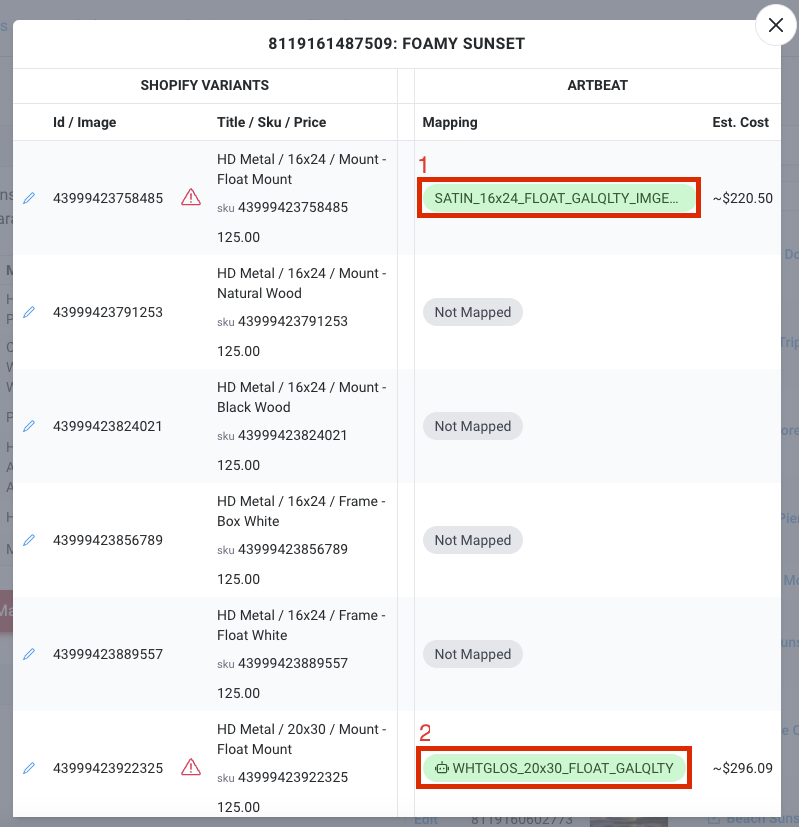
Image 1-2: A screenshot highlighting the indicators of successful variant mapping
Example 2: Configure specific size
Use VM when you want to offer alternative sizing options, for example: Small, Medium, Large, etc.
Or
Your size display on your website is different than the print size. For example: An 11"x14" display with an image that is 1150x1400 would print out as 11.5"x14".
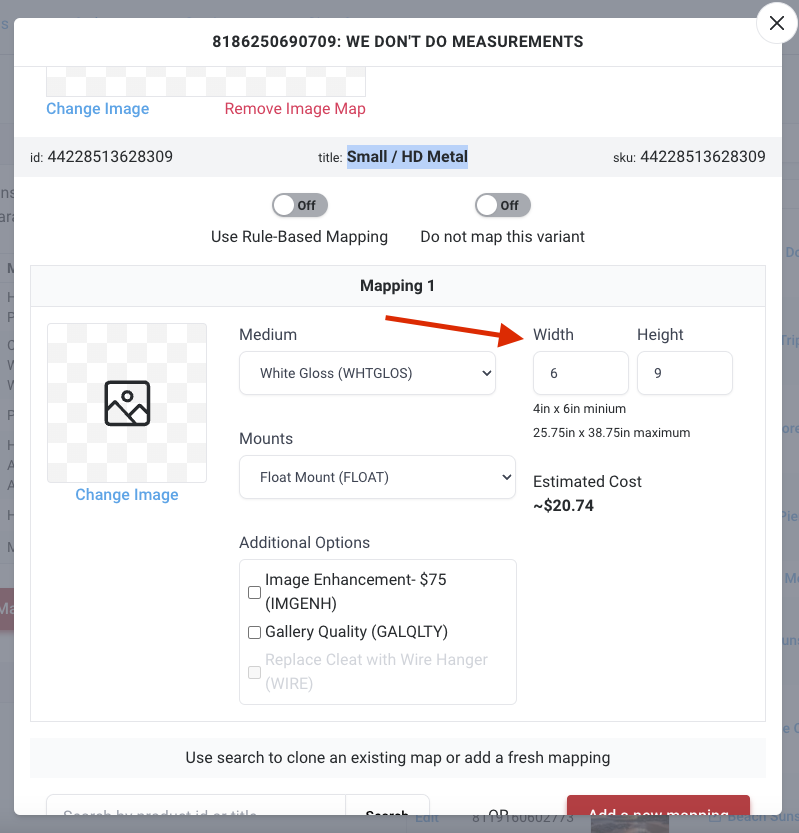
Image 2-1: A screenshot of where variant size can be managed when using Variant Mapping
The field identified with the red arrow in Image 2-1 is where you can set the desired print size for this variant. This variant of "Small/HD Metal" has been set to print at 6" x 9".
The mapping column in the red box in Image 2-2 shows that each variant has a variant mapping to their intended print size, which is respectively:
Small = 6" x 9"
Medium = 12" x 18"
Large = 16" x 24"
Extra Large = 20" x 30"
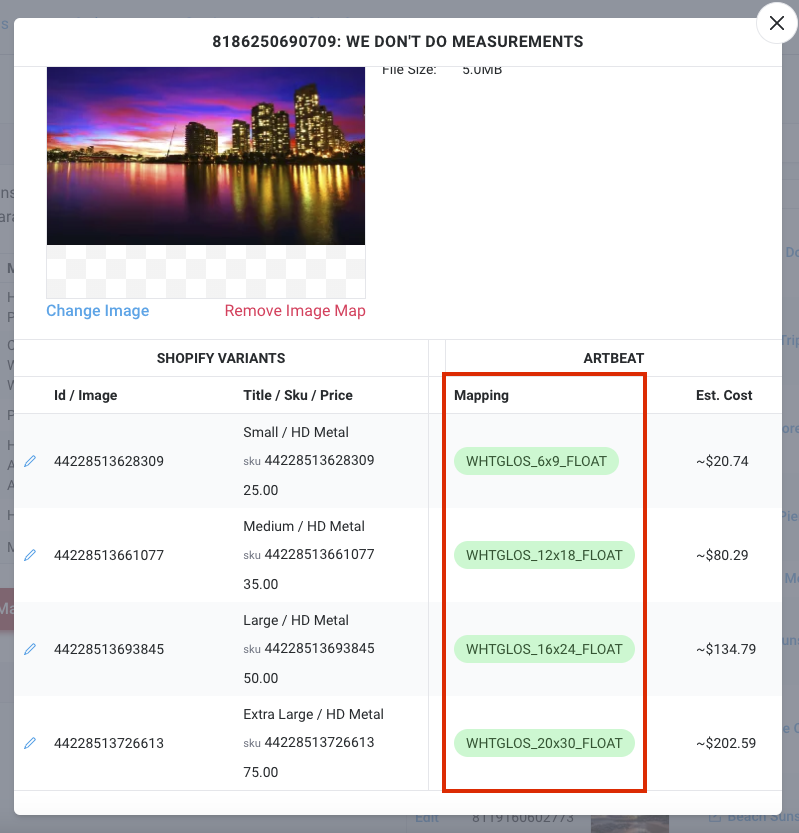
Image 2-2: A screenshot of the indicators that size has been successfully mapped through Variant Mapping
Example 3: Mapping additional services
This example shows you how to include additional services to a variant.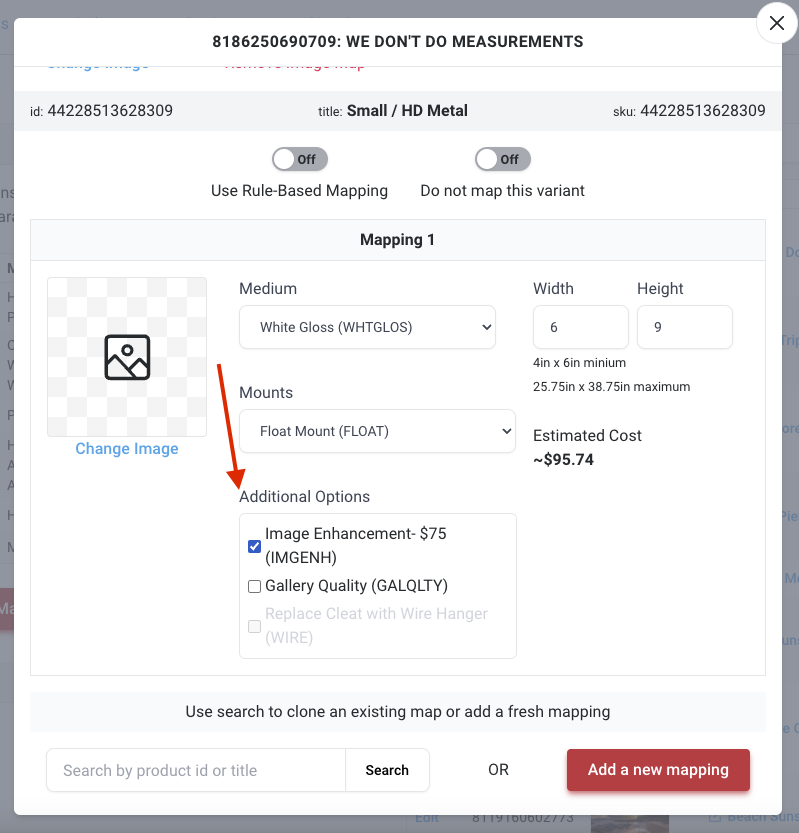
Image 3-1: A screenshot indicating where additional services can be added to a variant during Variant Mapping.
The field identified with the red arrow in Image 3-1 is where we can apply any desired additional services to a variant.
The outlined red box in Image 3-2 now shows the SKU contains "IMGENH" for the "Image Enhancement" service.
Further, note that the other variants for this product do not contain IMGENH so they will NOT get the "Image Enhancement" service.
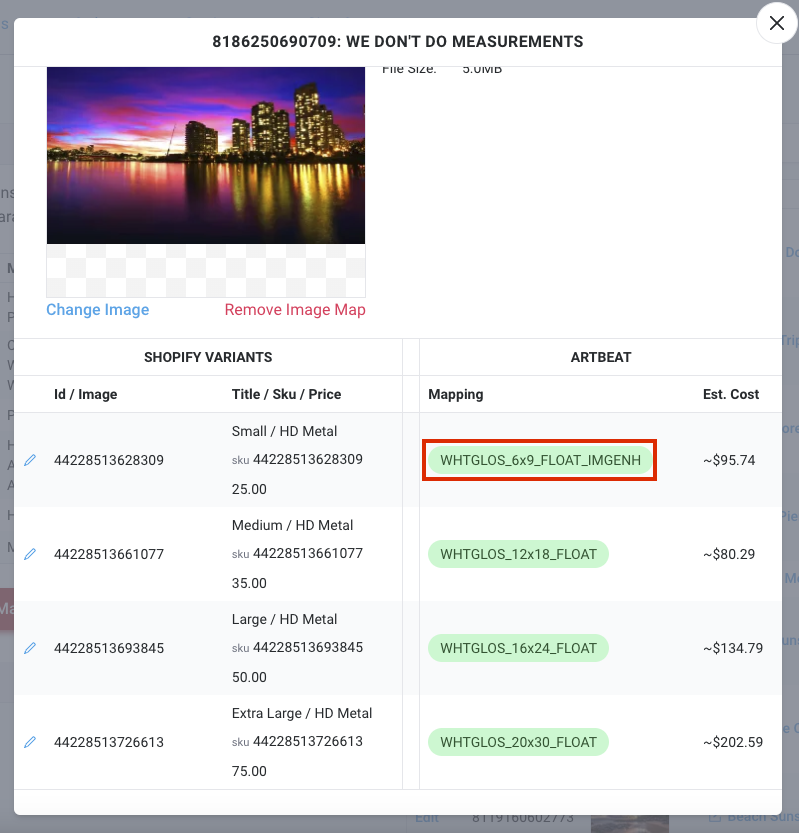
Image 3-2: A screenshot highlighting the successful configuration of size for all listed variants in Variant Mapping
Example 4: Mapping different images
You wish to map an image other than the product root image to a specific variant.
Image 4-1: A screenshot indicating where you can set the variant image
The field identified with the red arrow in Image 4-1 is where you can change the variant image.
Image 4-2 shows a variant using a different image than its root product image.
Note that the other variants for this product do not have a thumbnail image so these variants will use the root product image.

Image 4-2: A screenshot indicating where images mapped directly to a variant are displayed in the variant listings
Bundles Mapping
Variant Mapping allows you to map multiple Artbeat products to a single variant. This powerful feature allows complex configuration of multi-piece set(s), such as triptychs, grouped products, multiple quantities, etc.
Example 1: Multiple Artbeat product mappings
This example shows one variant having multiple Artbeat product mappings.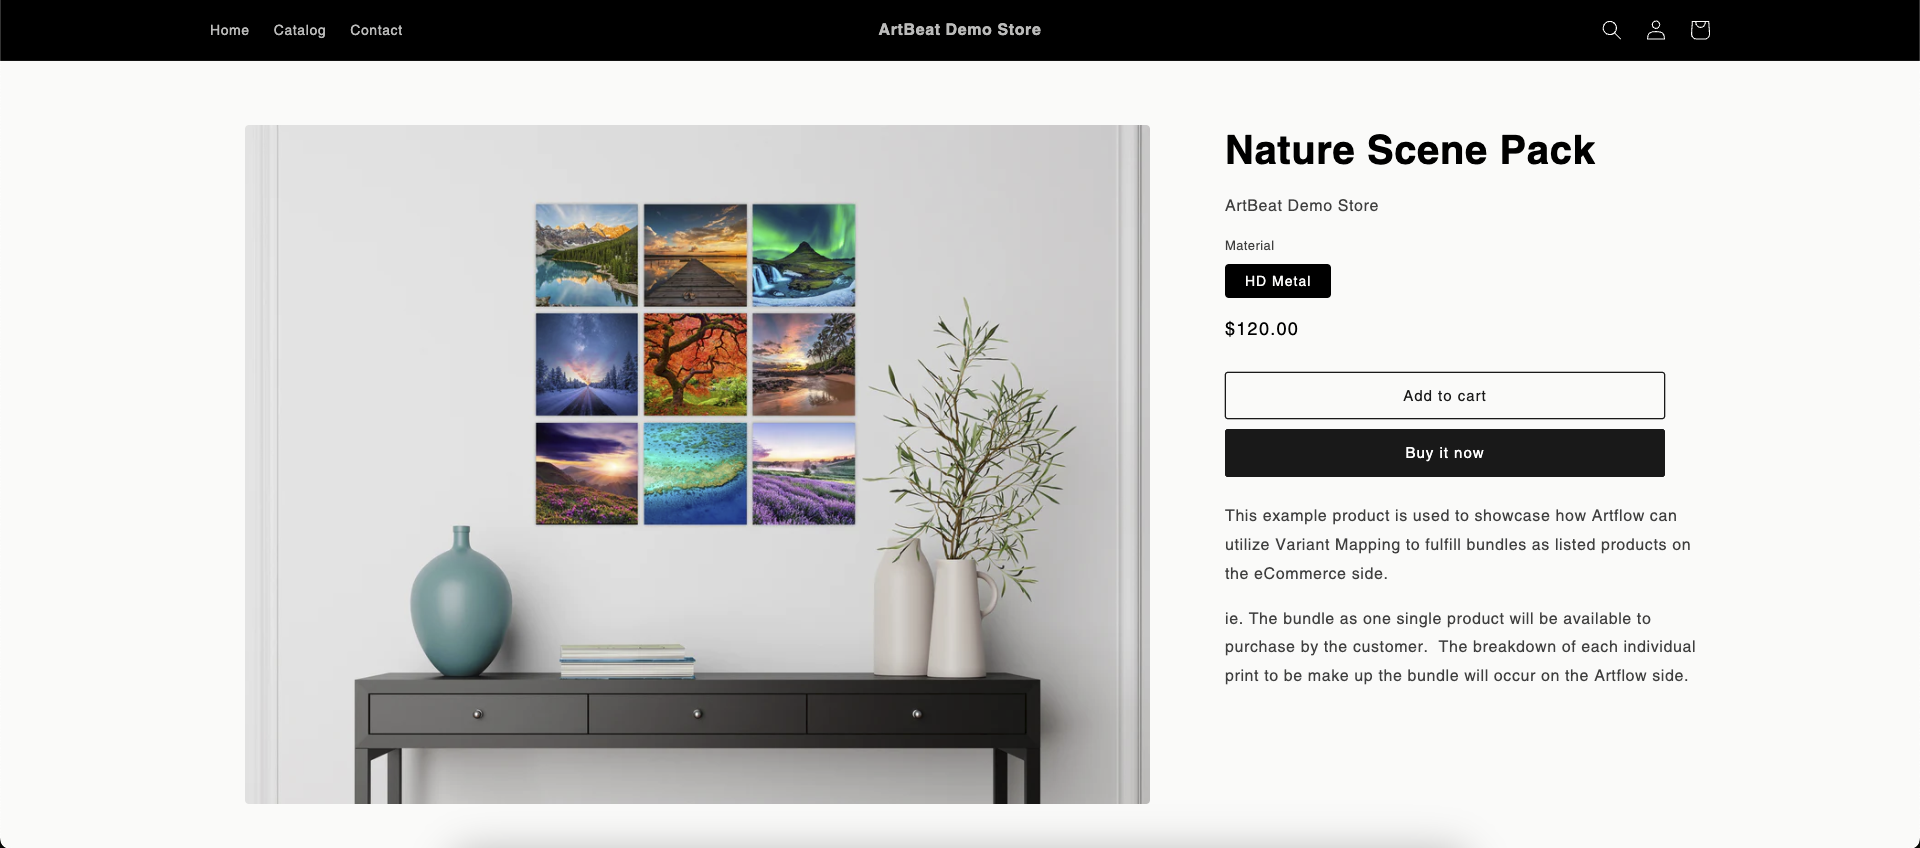
Image 5-1: A screenshot of a bundle "Nature Scene Pack" customer-facing product page on your eCommerce store
Given the product example in Image 5-1, you can follow these steps to create 9 Artbeat product mappings, see Video 2(a) for visual reference:
On Artflow "Products" page, search for your bundle product to edit.
Choose the variant to configure and press the Blue Pencil (Edit)
Disable the RBOM for the variant
Add an image and configure the mapping selection and size for the first mapping.
Press "Add A New Mapping" for additional Artbeat product mapping
Repeat Step 4 and 5 until you are done.
Hit Save to complete the process.
Video 2(a) - A video walkthrough of how to configure a bundle in Artflow
How Artflow Handles Size
Artflow can determine the print size via two different methods:
Method #1 - Extracted from your Option Value
When one of your variant options values has the following size pattern then our app will use a regular expression to retrieve your print size:
| Unit | Option Value | Parsed print size |
|---|---|---|
| (not specified) | 10 x 10 | 10" x 10" |
| " | 10" x 10" | 10" x 10" |
| in | 10in x 10in | 10" x 10" |
| inch | 10inch x 10inch | 10" x 10" |
| inches | 10inches x 10inches | 10" x 10" |
| cm | 20.32cm x 25.4cm | 8" x 10" |
| ' | 1' x 2' | 12" x 24" |
| ft | 1ft x 2ft | 12" x 24" |
| foot | 1foot x 2foot | 12" x 24" |
| feet | 1feet x 2feet | 12" x 24" |
If you use any other size value, such as Small, Medium, etc, then RBOM will not work and you will need to use method 2 to map your variant size.
Method #2 - Variant Mapping your size
Edit a variant and disable RBOM to specify your mapping and size. Please see the above example #2 of Variant Mapping Examples.
Please note that the maximum supported print size is 40" x 60". Any larger will require freight shipping, please contact us if you'd like to discuss options.
Mapping High Resolution Images to Products
Once you have uploaded your images, please use the following steps to map images to your products, or view our Video 3(a) for a walkthrough:
On the "Products" page, search for your product to edit.
Click the “Edit” button
Click the “Change Image” button
Locate your desired album and image then check the corresponding checkbox
Click the "Save" button to submit
Video 3(a) - A visual example of how to map images from Albums to Products
Managing Orders
Artflow's Orders page provides a convenient place to view both your platforms' order queue AND your Artbeat order queue simultaneously. See Image 6-1 for an example.
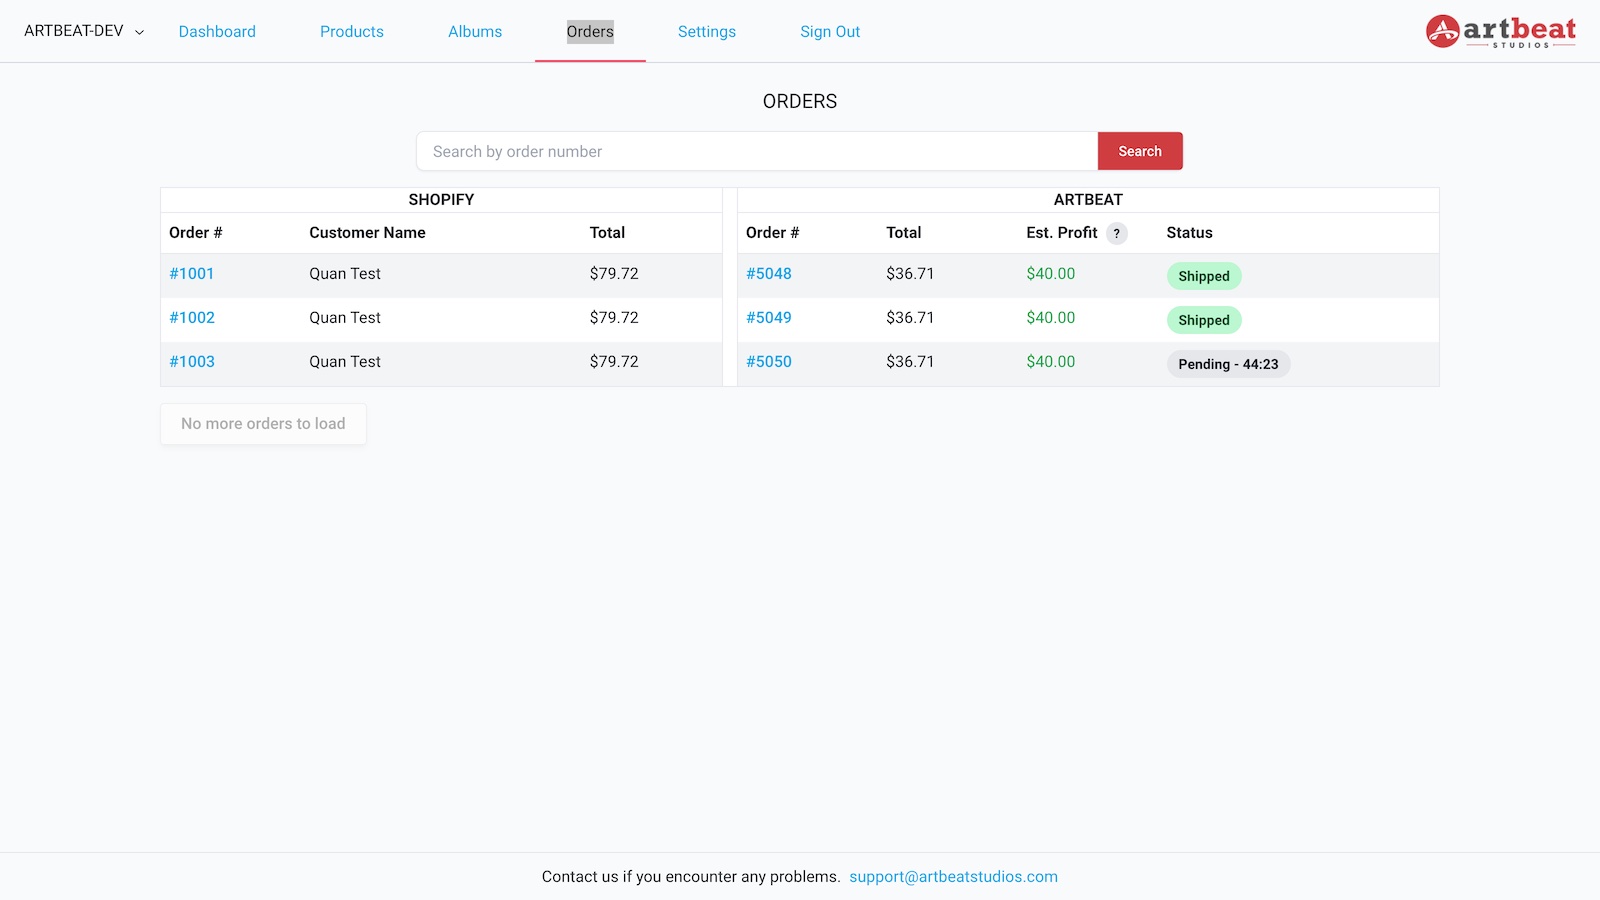
Image 6-1: A screenshot of the top level Orders screen in Artflow displaying sample orders
Platform Order Columns
Order #: Your e-commerce platform's order number. Clicking this value will take you to your platform's order detail page.
Customer Name: Your order's customer name that placed this order in your platform.
Total: Amount your platform charged and collected from your customer.
Artbeat Order Columns
Order #: Artbeat's order number you can reference once the order is processed. Clicking this value will display Artbeat's order detail in a modal. See Image 6-2 for an example.
Total: Amount Artbeat charged your credit card for processing this order.
Est. Profit: Estimated profit is determined by subtracting our total from your platform's order total, with taxes excluded from both figures due to variations in tax rates or tax-exempt status.
Status: Quickly view our production status for your order. Tracking information will also be displayed in this column once your order ships.
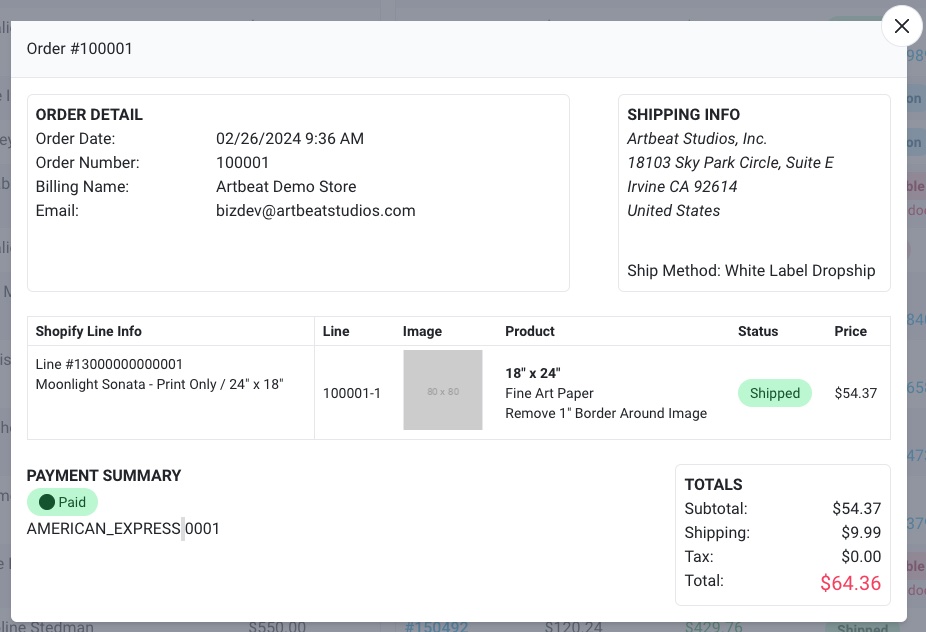
Image 6-2: A screenshot of order details in Artflow (redacted)
| Order Detail: | Order Date, Order Number, Billing Name, and Email will be displayed in this section. |
| Shipping Info: | The shipping address data and ship method are displayed here. |
| Line Info: | Each line item is viewable in this section along with Artbeat's product in full details for each line. |
| Payment Summary: | The payment method and status of the order will be displayed here for easy reference. |
| Totals: | This area provides a breakdown of the total due to Artbeat Studios for the order. |
Settings - Data Connection
This widget displays our connection with your e-commerce platform as defined above in Connecting Your Products section.
Platforms that we can use webhooks will display 'Connected'.
You can always manually click on 'Initiate Sync' to have our system perform a one-way product data retrieval.
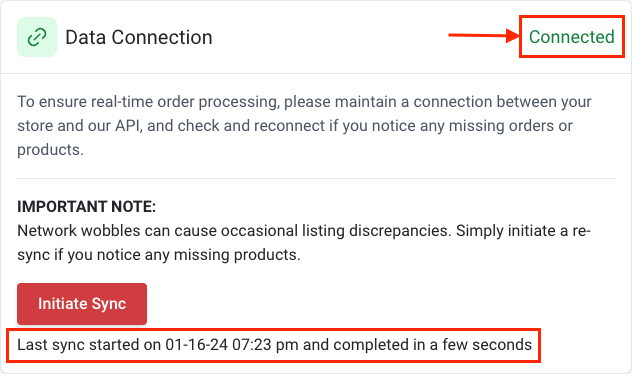
Image 6-4: A screenshot of the Data Connection section of Settings in Artflow.
Settings - Payment Profiles
This section showcases the payment method saved in your vault, which will be used for processing your orders. We prioritize data security and never store identifiable payment information. Instead, we utilize a secure token from our payment provider, ensuring your data is stored in compliance with PCI standards.
Please follow these steps to add a payment method, or view our Video 5(a) for a walkthrough:
On the "Settings” page.
Locate the “Payment Profiles” section and click “Add Payment”.
Enter your payment details.
Then click “Submit” to save.
Video 5(a) - A visual example of how to add a payment method in Artflow
Settings - Configurations
The Configurations section provides you with the ability to manage certain aspects of Artflow's logic for your store.
Each setting is accompanied by a brief description of its function. For instance, 'Order Processing Delay' refers to the duration, in minutes, by which we postpone the processing of an order from the moment we receive your platform's order details.
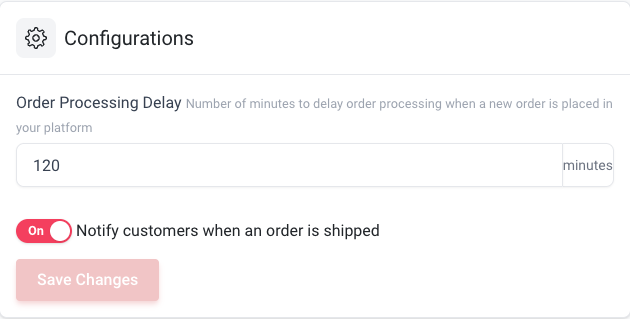
Image 6-5: A screenshot of the Configurations section of Settings in Artflow
Settings - Cost Calculator
The Cost Calculator offers a quick method to determine the price for a specific Artbeat product configuration, taking into consideration your cost level.
This calculator also helps you verify the availability of product configurations. For example, you can use it to check if the float mount option is available for Acrylic products.
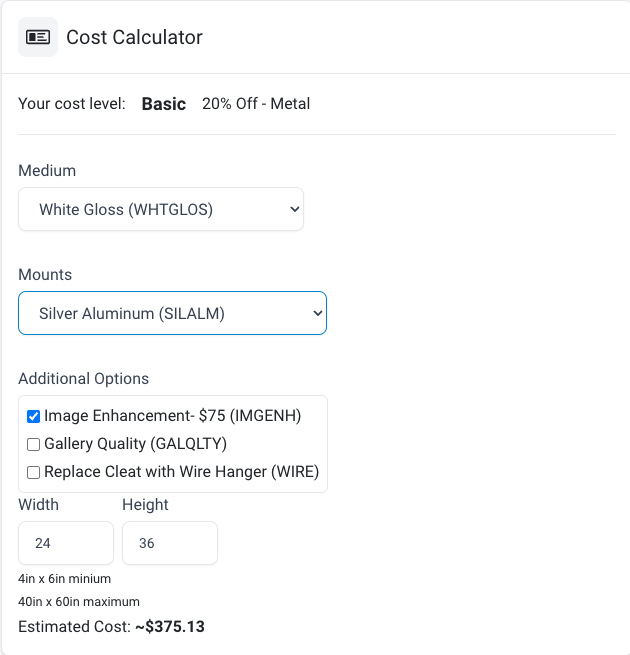
Image 6-6: A screenshot of the Price Calculator section of Settings in Artflow
Settings - Package Customization
The Package Customization section allows you to control your branding and personalize your shipments! If you do not want any inserts then you can toggle on 'Do Not Include Inserts' to be excluded.
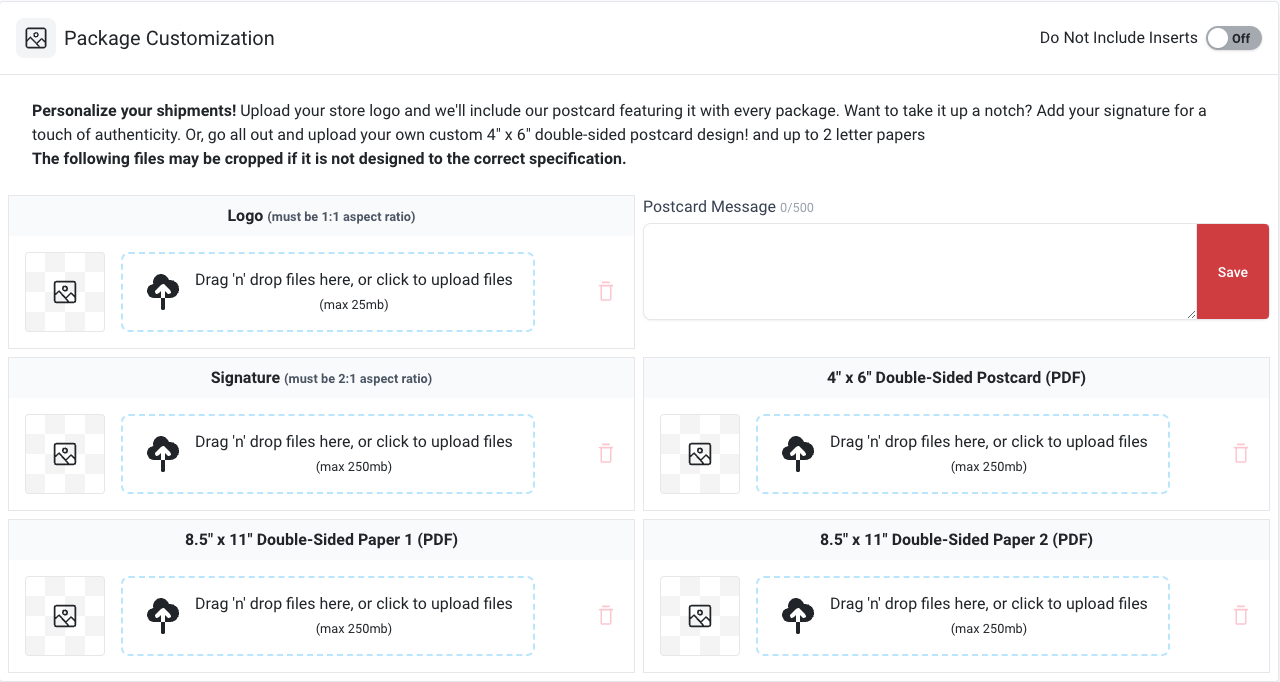
Image 6-7: A screenshot of the Package Customization section of Settings in Artflow
| Logo: | Upload your store logo to have it printed and included with every order on a 4x6 high-quality card stock |
| Postcard Message: | Add a personalized message of up to 500 characters for your customers! |
| Signature: | Upload an image of your signature here to have it printed on a 4" x 6" postcard insert. Please note that the signature will be resized to fit within a 2" x 1" area of the postcard. |
| 4" x 6" Double-Sided Postcard: | Upload your own 4" x 6" PDF design and we'll print it double-sided onto premium card stock. Please note, if you opt for a custom design, then we will not use your logo nor signature. |
| 8.5" x 11" Double-Sided Paper 1: | Upload an 8.5" x 11" PDF file to have it printed and included with your orders. Page 2 of this pdf will be printed on the reverse side of the paper. |
| 8.5" x 11" Double-Sided Paper 2: | Upload a second 8.5" x 11" PDF file to have it printed and included with your orders. Page 2 of this pdf will be printed on the reverse side of the paper. |